|
|
|
Get Your House in Shape for Football Season With an Outdoor Oven
(ARA) - Summer is coming to an end and you know what that means -- the 2008 football season is just around the corner. In less than a month the season begins, and if you want your home to gain a reputation of being "the place" to enjoy the game, now is the time to start getting ready. A good place to start is by stocking up on supplies: disposable cups, plates, napkins, serving trays and utensils; soda and bottled water; chips and pretzels; and all the right gear to cheer on your team. You'll also have to decide where everyone will gather to watch the big game, keeping in mind, as long as the weather is nice, the "best place in the house" won't be in the house at all, but in your outdoor living room. According to the National Association of the Remodeling Industry (NARI), extending the footprint of your home by creating living space outside is one of the hottest trends in home remodeling right now. Gone are the days when all you had outside was some patio furniture.
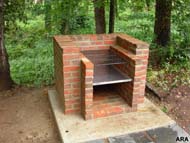
If you don't have a barbeque oven yet, but want to create an outdoor living space in time for football season, start by deciding where it should go, then invite some friends over to help you build one. Here are free outdoor oven plans and how to build it: Required Materials:
Required Tools:
Directions:
For more detailed directions on constructing a slab footing and laying block and brick for your barbeque, log on to www.sakrete.com and click on the link that says "Take Me to the Sakrete Project Center." Sakrete products are available at your local hardware and building supply retailer. Once the barbeque is built, take the time to trim back any overgrown vegetation and, of course, mow the lawn the day before your guests are set to arrive so the yard will look neat, tidy and inviting -- just like a well-manicured football field. Sit back, crack open your favorite beverage and listen to your friends talk about your house being the entertainment mecca. For more information on making the ideal outdoor living space, please read these articles:
|
|
||||||||||||
|
||||||||||||||
|
|
||||||||||||||

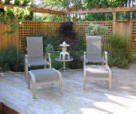
 These days, people's backyards have all the comforts of home
-- a relaxing place to sit, electrical connections for televisions and stereos
and a refrigerator where snacks and drinks can be stored. People are also
putting in outdoor ovens that do double duty, not only providing a place to cook
brats and burgers, but on those upcoming cold winter days, warmth as well.
These days, people's backyards have all the comforts of home
-- a relaxing place to sit, electrical connections for televisions and stereos
and a refrigerator where snacks and drinks can be stored. People are also
putting in outdoor ovens that do double duty, not only providing a place to cook
brats and burgers, but on those upcoming cold winter days, warmth as well.